Larabar

On a dark and dreary day in September, my little and I went on an adventure…to the grocery store. In all actuality I am unsure if the day was dark and dreary, however we did in fact go to the grocery store-in search, once again, of dairy-free snacks and foods to make our lives a little more convenient.

My little loves going and looking at the “protein bar” section, I realize that I should be grateful that he chooses this aisle over the candy aisle. Well on this dark and dreary day he chose a Chocolate Chip Cookie Dough Larabar; I picked one up too, because you know, Momma has to try it too! Honestly, I was unsure if either of us would like them because the ingredients were extraordinarily healthy…cashews, dates, chocolate chips and sea salt…I mean come on, you can’t get much healthier.


Larabar

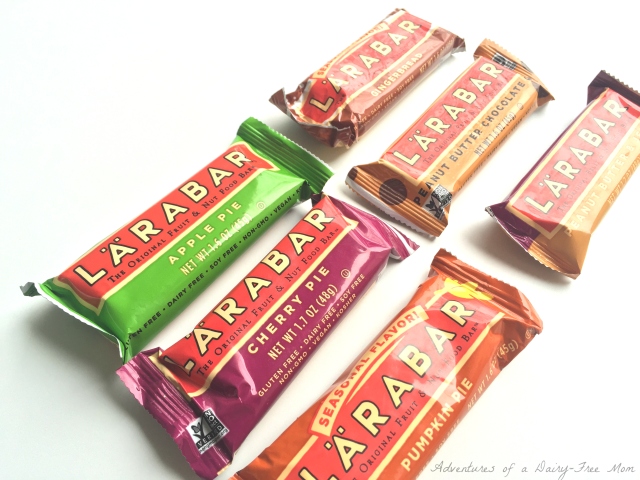
Well, we loved them! Now Larabar has become our go-to bar. I love finding convenient food that tastes good, and that I feel good about me and my family eating. Plus there is such a variety of yummy flavors, and chocolate! Chocolate is a must. So with our new-found love, I recently e-mailed Larabar to see if I could do a review of their products, and they happily sent me a care package with some samples.

I will admit, these did not last long at all. Thee days tops.

Larabar Side Angle


I was hoping to share with you my favorite flavor, but I honestly love them all. The Cherry Pie was tart, just like a cherry pie should be, the Pumpkin Pie and Gingerbread made me feel like Christmas. There is one flavor that I surprisingly haven’t tried yet, and I say surprisingly because of my obvious love for coconut and chocolate, which is the Coconut Chocolate Chip bar! When I asked the littles what their favorite flavor was, they said the ones with chocolate, it doesn’t matter which one, just one with chocolate, oh and the Peanut Butter and Jelly…genius!

Peanut BUtter and Jelly Larabar


So if you dig healthy convenient food, I would definitely encourage you to try out a Larabar, or two or three. You can check them out on their Facebook, Instagram, Twitter and Pinterest. Or order products, learn about the company and sign up for an eNewsletter on Larabar’s Website. Let me know how you like Larabar, and what your favorite flavor is!

Happy Eating 🙂

P.S. I was not paid for this review, all opinions are mine!

Lunchtime Giveaway! [Closed]

Happy Saturday! Today is a special day because it’s time for another giveaway.

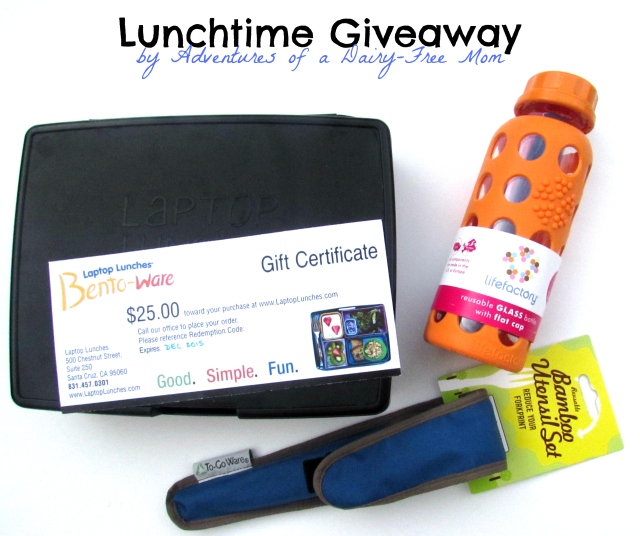
This [mini] giveaway has some great items for lunchtime:

1) Laptop Lunches was so gracious to give my lucky winner a $25 gift certificate to order your very own Bento-Ware! (the lunchbox in the picture is mine and not included in the giveaway)

2) 9 oz Lifefactory glass water bottle.

3) To-Go Ware Bamboo Utensil Set which includes a fork, knife, spoon and chopsticks.

4) Plus a surprise treat 😉

Lunchtime Giveaway by Adventures of a Dairy-Free Mom

Now for the rules!

There are two different ways to enter.

This giveaway is starting Saturday August 30th and will end Saturday September 6th at 9 pm PST.

1) Follow my blog

AND

2) Comment on this post sharing a lunchtime tip or your favorite item to pack for lunch.

OR

1) Follow me on Instagram @dairyfreemommy

AND

2) Hashtag (#dairyfreemommy) a photo of your lunch or bento-ware and tag me (@dairyfreemommy) in the photo!

Good luck 🙂

UPDATE:

Thank you to all who entered this giveaway! Thanks to Random.org, Michelle is our winner. Yay Michelle 😉


More Bento-Style Lunches and Tips:
Five Tips to Packing a School Lunch

Five Tips to Shopping Smart

Check out Laptop Lunches BentoWare!

Bento-Style Lunches: Week 2

Let me just start off by saying that there will be something EXCITING happening and you don’t want to miss out! So make sure you check back this time next week to see what it is…I know the suspense is killing you!

My Five Tips to Shopping Smart

1. The golden rule: Keep it simple! Don’t over complicate the process, keep your lunch simple.  Let’s be honest, ain’t nobody got time for the over-the-top lunches we see on Pinterest.

2. Shop smart: Plan your shopping trip. I shop for two weeks at a time, and I plan every breakfast, lunch and dinner (around what is on sale). This not only helps you to keep costs down, but also helps you to plan and never feel like you don’t know what to eat or pack for lunch.

3. Know your store: I actually did an “experiment” and bought groceries at all of our local stores, and some of them tout they have the cheapest prices, but no one was able to beat the prices I get for groceries at Safeway by downloading coupons to my card and using the Just 4 U program. By knowing Safeway, I know what isles I need to go down, and what isles will trap me into wanting to buy snack foods, or cake mix for only $0.99. So, I stick to the perimeter of the store, which houses the produce, deli, dairy and meat departments, and only go down the isles that have additional things I need, like frozen veggies and tortillas!

4. Don’t shop hungry: Hunger makes us do bad things sometimes 😉 So make sure you eat beforehand so that you don’t end up making impulse purchases on lunch goodies that look appealing…which brings us to the final tip…

5. Don’t fall victim to marketing. Commercials and branding can make us feel like we NEED to buy special items for ourselves or our family, whether products are touting health benefits or appealing to our kids. Pass up the granola bars dipped in chocolate, and make some at home. Better yet, get your children involved in making snacks and goodies for their lunches, they will feel like they are getting something just as special, if not more.

This weeks Bento-Style Lunch:

DF Laptop Lunch Ideas

1)  Mandarin orange and peas.

2) We love bananas in this house!

3) A turkey sandwich. I pick up cookie cutters when I find them on great deals. A dino sandwich is much more fun 😉

4) Earth Balance makes vegan cheese crackers, saaayyy what?! We had to try them because I may or may not have had an addiction to Cheez-its in my younger years.

5) Sunflower seeds mixed with some dairy-free chocolate chips for a treat.

Enjoy! 🙂

More Bento-Style Lunches and Tips:
Five Tips to Packing a School Lunch

Check out Laptop Lunches BentoWare!

Bento-Style Lunches

It’s time to start thinking about school lunches again! I’ve fallen in love with bento style lunches, and these containers from Laptop Lunches Bento Ware; which are BPA free and they offer a lot of selections in cute colors, plus extras to make lunch time more exciting. They make it so easy to portion out foods, and make it fun for the kiddos and grownups. I wanted to share a few of my tips to make packing school lunch easier, and that will surely encourage your kiddos to gobble up all their food rather than wanting to trade with their friends!


My Five Tips to Packing a School Lunch:

1) Get your kids involved. Let them pick out something for their lunch at the grocery store, or give them options from what you have around the house to pack in their lunch. This helps to empower them, and this is a great teaching opportunity for making healthy choices!

2) Choose easy to eat foods. Make or pack bite sized food and/or food that is easy for little hands to pick up and eat.

3) Variety. It can be boring eating the same sandwich for lunch. Add in different fruits and veggies that are in season.  You can make sandwiches more exciting by making “sushi” or cutting them in into fun shapes…or get creative and choose something that isn’t a sandwich at all!

4) Make homemade snacks and treats. By making homemade foods you can get your kids involved and excited in the process, plus this is often more cost-effective compared to buying prepackaged foods and most importantly you control the type and quality of the ingredients. Muffins, granola bars, and cookies are great options!

5) Buy in bulk. Buy foods in bulk, such as snacks, veggies, vegetables and yogurt. You can portion out these foods into individual servings so they are easy to grab and pack into a lunch. While go-gurts are fun, they are often more expensive than buying a big container of yogurt for the whole family and portioning it out for everyone’s lunch.

This is the first of many weekly lunchbox ideas that I will be sharing with you, that are of course dairy-free!

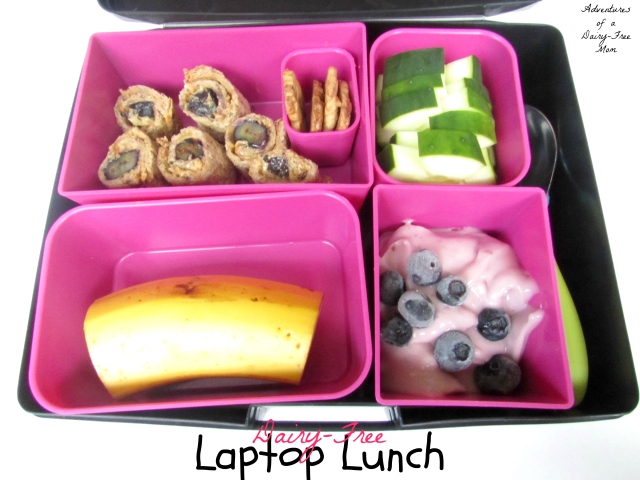
 Dairy Free Kids Bento Style Laptop Lunch

1) Peanut Butter and Blueberry “Sushi” rolls. Take a piece of bread and roll it flat. Spread a layer of peanut butter. Add blueberries and roll, roll, roll. Then cut into three or four pieces. Viola “sushi”!

2) Barbara’s Animal Cookies

3) Cucumbers.

4) Banana.

5) So Delicious Coconut Milk yogurt with blueberries on top.


Dairy Free Bento Style Laptop Lunch


1) Quinoa Salad. Cook quinoa; once cooled add in chopped cilantro, avocado and tomato. Squeeze fresh lime and salt and pepper to taste.

2) Limes for quinoa salad, or to even put into your bottled water.

3) Banana

4) Cucumbers and yellow pepper strips

5) So Delicious Coconut Milk yogurt with blueberries on top.

Enjoy 😉

More Bento-Style Lunches and Tips:
Five Tips to Shopping Smart

Check out Laptop Lunches BentoWare!

P.S. Review and opinions are all based upon my experience and thoughts. 

No-Bake Peanut Butter Chocolate Coconut Granola Bars

Okay, I may have a problem….the combination of chocolate, peanut butter and coconut is to die for. Like really, it is my favorite EVER!  I contemplated making an “all the things” meme, that’s how much I love it.

Deep breath…

Granola bars are so convenient, and quite delicious. It’s tough to find some in the grocery store that aren’t expensive and don’t have dairy or loads of sugar. So yesterday I made a batch of granola bars and individually wrapped them for lunches or snacks or like this morning getting tossed in my purse to eat on-the-go for breakfast.

DF Granola BarsNo-Bake Peanut Butter Chocolate Coconut Granola Bars

Makes approx. 12-14

Bars:

2 cups oats (gluten-free)

1 cup brown rice krispy cereal

1 cup shredded coconut

2/3 cups brown rice syrup

1/2 cup (heaping) of creamy peanut butter

1/4 cup unsweetened cocoa powder

1 1/2 tsp vanilla

1/2 tsp sea salt

Topping (optional):

1/8-1/4 dairy-free chocolate chips*

 2 Tbsp creamy peanut butter

1 Tbsp (heaping) shredded coconut

Combine brown rice syrup and peanut butter, heat in a microwave safe bowl for 30 second intervals until peanut butter is melted, or on the stove in a small saucepan over low heat. Stir well.

Add vanilla, sea salt and cocoa powder to the peanut butter and brown rice syrup, mix well. Add in oats and coconut, once incorporated add in the krispy cereal and stir gently until mixed.

Take an 8×8 dish and line with parchment paper. Spoon the mixture into the dish and pack the mixture down with your hand, spatula, spoon…you get the point.

Melt the 2 Tbsp of peanut butter, just enough that it can be easily spread. Drizzle all over the top of the bars. Sprinkle on coconut and chocolate chips! 

Stick bars in the freezer for an hour or until firm. Remove easily from the pan with parchment paper and then cut into bar shapes. 

Store in an air-tight container or wrap individually.

*I typically use Enjoy Life brand chocolate chips, but at a local food coop I found a bag of Equal Exchange 70% chocolate chips and used them for these granola bars. Fantastic!

DF Chocolate Coconut Peanut Butter Granola Bar

Enjoy 🙂


Toddler Hulk Muffins

Have I mentioned that my little is Batman? Well he is…but sometimes he likes to be other superheroes too, like Captain America or the Hulk and now he is totally into Ninja Turtles as well. Anyways, since my life seems to revolve around superheroes, it was only fitting to call these [super] yummy green and purple muffins, Hulk Muffins!

I know, I know, he is no longer a “toddler” but toddlers are sure to love these muffins, just like my…preschooler. I am having a hard time letting go of my little baby who just wanted to be held all day, isn’t three too early to be a big kid? He is such a strong and independent boy who is so full of life and is so adamant about learning new things, and doing everything by himself. He also doesn’t want to be called any of those mushy nicknames, like my baby or boo bear…the list goes on…sometimes I slip up and call him a mushy name, and he reminds me, “Mom, I am not a baby, I am a big kid.”

On to the muffins…

I haven’t made a “toddler” muffin in quite some time, but I really wanted to make something that didn’t have flour and contained fruits and veggies that could easily be tossed into a lunch-pail. I had just bought a big container of spinach and blueberries from Costco, which I immediately washed and froze in individual baggies for smoothies (more on that another day)…but I thought hey, those would be perfeeecccttt for a muffin!

Toddler Hulk Muffins

Makes approx. 30 mini muffins

2 cups rolled oats (not all oats are gluten-free, check the labeling)

2 bananas

2 eggs

1 heaping handful of spinach

1-1 1/2 cup blueberries

1 cup dairy free yogurt (I used coconut yogurt)

1/4 cup brown sugar

1 1/2 tsp baking powder

1 tsp vanilla

1/2 tsp baking soda

Pre-heat oven to 400.

Blend or food process the oats, yogurt, spinach, sugar, baking powder, baking soda and vanilla until smooth, although there will be some texture from the oats. Add in eggs. Once combined fold in the blueberries.

Grease or line muffin tin. Fill compartments 3/4 full. Stick them in the oven and bake for 8-10 minutes.

P.S. These aren’t just for toddlers, I loved them too!

P.P.S. Go check out my Instagram over there —-> on the right side of the screen. Follow me and stay updated on the daily (or close to it), or if you don’t have an Instagram you can still go check out the pictures!

Happy Baking 🙂

Doggy Birthday Cake

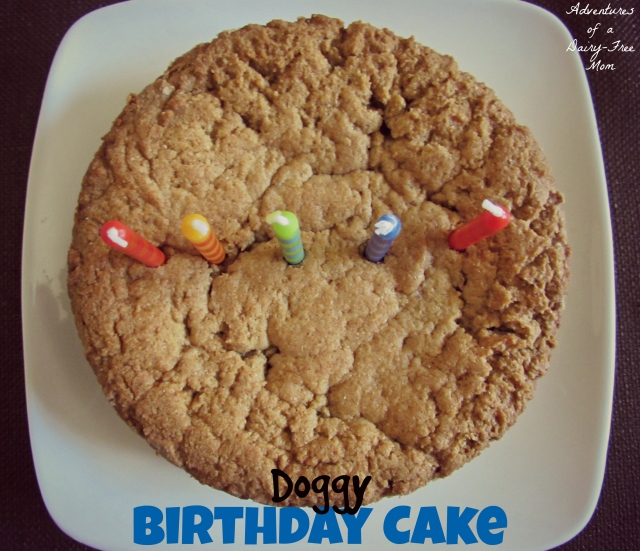
Today is a very special family members 5th birthday. We decided to celebrate with a cake of course!

Dog Birthday Cake

Yes, I am one of those dog owners that believes that human food is okay in moderation. And let me tell you, I had a couple of happy pups on my hand!

Peanut Butter Banana Dog Cake

1/4 cup peanut butter
1/4 cup soft coconut oil
1/3 cup honey
1/2 banana
1 tsp baking soda
1 cup whole wheat flour

I used a 6×3 cake pan, I feel that an 8 inch pan would be too large.You could also make pupcakes…see what I did there?

Pre-heat oven to 350 degrees.

Mix the banana until smooth. Add peanut butter, coconut oil and honey to the banana and mix well. Next, add in the baking soda and flour and mix until it is incorporated into the batter.

Spoon batter into a greased cake pan. This batter will not be runny, smooth out the top if necessary.

Stick in the oven and bake for 15-20 minutes.

Let the cake cool and serve it up for your birthday pup!

Pup Birthday Cake

P.S. I tried a little bite, not too shabby 😉

Vegan Chocolate Cupcakes

It’s official. I no longer have a toddler! What do I classify him as? A child? A pre-schooler? Either way, I am a little sad that he is growing up, next thing I know he’ll be leaving for college…insert dramatic tears.

Those who know this little man, know he is Batman. When you’re Batman, you need a Batman party and thus the vegan chocolate cupcakes began.

Vegan Chocolate Cupcakes

Vegan Chocolate Cupcakes

Makes approx. 14-17

1 1/2 cups all-purpose flour

1 cup sugar

1 cup water

2/3 cup unsweetened cocoa powder

1/2 cup coconut oil (soft)

1 1/2 tsp vanilla

1 tsp baking soda

1 tsp vinegar

1/2 tsp salt

Preheat the oven to 350 degrees. Mix together the flour, sugar, cocoa powder, baking soda and salt. Then add in the water, coconut oil and vanilla; once combined add in the vinegar. Grease or line the cupcake tins, fill half way. Bake for 18-22 minutes.

These cupcakes are soft and fudge-y and got rave reviews from those who ate them!

Vegan Batman Cupcake

To turn these into Batman cupcakes, make vegan frosting or use a store-bought vegan frosting, like this one from Duncan Hines. Mix the frosting with a yellow food coloring, until you get a golden-yellow. Frost the cupcakes. Then use a batman cookie cutter, like this one from Etsy and cut out Batman shapes for the top of your cupcakes. Fondant would probably work, especially in black, but I wanted to use something a little tastier. I tried this with fruit roll ups, which worked great but I couldn’t find a color that I liked, so I ended up using fruit leather!

Batman Cupcakes

If you’re wondering how I made the cupcake stand, well shh… don’t let my secret out 😉 I took boxes we had lying around the house, I think the bottom layer was our battleship game…hehe, and I wrapped them with this awesome polka-dot wrapping paper from Target. Then I wrapped a black (thicker) ribbon around the boxes and then a yellow one on top. I cut out the logo from card-stock paper and glued it on with my hot glue gun. Easy peasy!


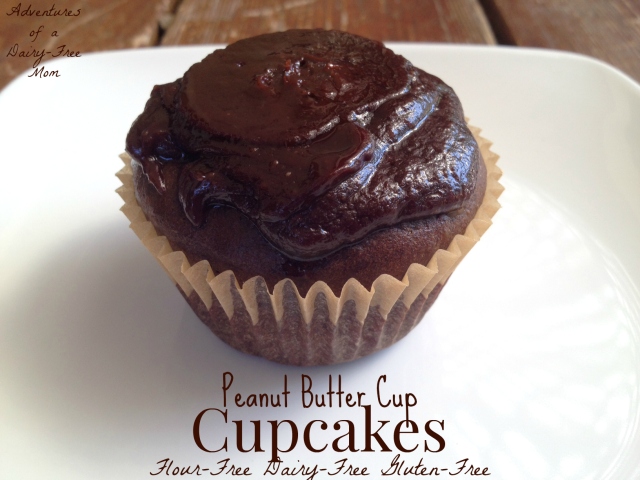
Flour-Free Chocolate Peanut Butter Cup Cupcakes

I’ve been experimenting with recipes that are free from flour, because honestly, can it get any easier than that?! Sometimes dealing with alternative flours can be a little tricky, and another plus is that you cut out a significant amount of carbs and extra calories.

As you all know by now, I love me some peanut butter! And it was my mom’s birthday, so basically that meant…CUPCAKE TIME!

PB Cup Cupcakes

Peanut Butter Cup Cupcakes

Yields 6 Cupcakes

Cupcake:

3 eggs

1 medium ripe banana

1/4 cup peanut butter

3 tbsp honey

3 tbsp cocoa powder

2 tsp vanilla

1 tsp almond extract

1/4 tsp baking soda

Filling:

1 tbsp peanut butter

1/2 tsp honey

dash of vanilla extract

dash of almond extract

Icing:

1/4 cup honey

1/8 cup rice milk

1/8 cup Earth Balance

2 tbsp peanut butter

2 tbsp cocoa powder

1 tsp vanilla

1/4 tsp almond extract

This recipe uses a good amount of peanut butter and honey, so make sure you have plenty on hand! I first mixed my banana, honey, cocoa powder, baking soda and extracts in my magic bullet so that I could get a smooth consistency and get rid of the banana chunks. I then poured the mixture into my bowl and added the peanut butter and eggs and mixed until smooth.

In a separate bowl, mix up the filling, the extracts are optional, I just poured in a little for some extra flavor. You can always taste test! I mixed the filling until it was a fluffier consistency. Add the batter into the cupcake tin (either greased or lined) until it is 1/4 full. Add 1 tsp dollop of the filling into each of the cupcakes. Add the remaining batter on top, which should be about 3/4 full.

Bake the cupcakes at 400 degrees for 9-12 minutes.

While the cupcakes are in the oven, take out a saucepan and stick it on your stove top over low heat. Add the ingredients for the icing, minus the milk. Stir the ingredients until melted and then slowly add the milk in while mixing. During this part it is beneficial to have a whisk, which I don’t have! GASP! I know it’s silly.

Once the cupcakes are done cooking and have cooled, add the icing on top. Then try not to eat them all in one sitting!

Enjoy 🙂